“I suppose every photographer has a vision of his ideal picture…so far, I haven’t got it and I don’t suppose I ever shall. I am aiming for something more than a picture – perhaps it is that I am wanting to do with my camera what I could only do with a box of water colours. It is I think, to catch that indefinable spell of the railway: to make visual something that can only be felt. Whatever it is I suppose I shall search for it all my life.”
Eric Treacy ‘Steam up’ 1947
Welcome to my new Settle to Carlisle Railway Gallery.
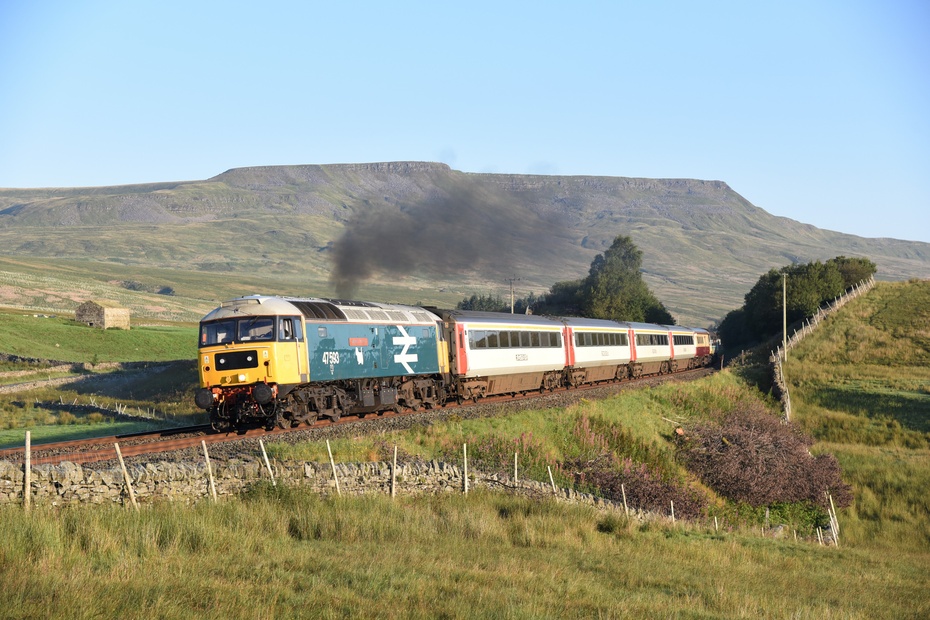
The Settle to Carlisle railway is truly a wonder of Victorian engineering. The Pennine route was once described by Eric Treacy, the greatest of all S&C photographers, as one of the 3 man-made marvels in the north of England along with York Minster and Hadrian's Wall.
This on-line gallery is my own personal tribute to the skills and the endeavour of the men who constructed the line, those individuals and groups who fought so hard to keep the line open, and to those men and women who operate and maintain the line currently.
The location galleries are listed in geographical order from north to south, starting at Carlisle and finishing around Hellifield.
I often get messages asking about my equipment and processing. I use an old, but reliable, Nikon D50 with a selection of lenses, the most frequently used being a Nikon DX 18-55mm f3.5, and an old Nikon 70-210mm f4. None of the pictures that appear on my site are digitally altered in any way. For me the enjoyment is being out at the lineside not sat at the laptop.
I hope you enjoy browsing and your feedback and comments are most welcome, the best way to leave a comment is in one of two ways, either through the contact tab or publically in the guestbook tab.
John Longden
John Longden's gallery contains 3370 photos.
Location Galleries
|
Latest shots
(Contains 777 photos) |
Carlisle
(Contains 5 photos) |
|
Durran Hill
(Contains 2 photos) |
Howe & Co. sidings
(Contains 3 photos) |
|
Cotehill
(Contains 4 photos) |
Horrock's Crossing
(Contains 2 photos) |
|
Wallace Field
(Contains 6 photos) |
Low House Crossing
(Contains 1 photo) |
|
Armathwaite north
(Contains 2 photos) |
Armathwaite Mill Brow
(Contains 1 photo) |
|
Armathwaite
(Contains 19 photos) |
Baron Wood
(Contains 1 photo) |
|
Lazonby
(Contains 2 photos) |
Eden Lacy House
(Contains 2 photos) |
|
Eden Lacy Viaduct
(Contains 4 photos) |
Salkeld
(Contains 1 photo) |
|
Langwathby
(Contains 8 photos) |
High Barn Farm
(Contains 3 photos) |
|
Greenlands Farm
(Contains 11 photos) |
Staingills Farm
(Contains 9 photos) |
|
Culgaith
(Contains 4 photos) |
Newbiggin
(Contains 27 photos) |
|
Newbiggin Station
(Contains 2 photos) |
Black Leases Farm
(Contains 3 photos) |
|
Kirkby Thore
(Contains 4 photos) |
Long Marton
(Contains 1 photo) |
|
Town End Farm
(Contains 27 photos) |
Keld
(Contains 11 photos) |
|
Appleby north
(Contains 5 photos) |
Appleby
(Contains 29 photos) |
|
Appleby - Causey Brow
(Contains 6 photos) |
Ormside
(Contains 28 photos) |
|
Breaks Hall
(Contains 6 photos) |
Griseburn
(Contains 8 photos) |
|
Stockber
(Contains 10 photos) |
Gallansay
(Contains 24 photos) |
|
Soulby Road Bridge
(Contains 7 photos) |
Crosby Garret
(Contains 32 photos) |
|
Crosby Garret Tunnel
(Contains 4 photos) |
Smardale viaduct
(Contains 23 photos) |
|
Smardale
(Contains 91 photos) |
Waitby
(Contains 36 photos) |
|
Waitby Common
(Contains 26 photos) |
Quarry Cutting
(Contains 3 photos) |
|
Kirkby Stephen
(Contains 21 photos) |
Bull Gill
(Contains 23 photos) |
|
Greengates
(Contains 69 photos) |
Birkett Common (northbound)
(Contains 23 photos) |
|
Birkett Common (southbound)
(Contains 34 photos) |
Birkett Tunnel
(Contains 3 photos) |
|
Low Frith
(Contains 17 photos) |
Lock Hill
(Contains 5 photos) |
|
Hall Hill
(Contains 1 photo) |
Carr Bridge (Mallerstang)
(Contains 2 photos) |
|
Angerholme
(Contains 33 photos) |
Milepost 261 (Angerholme, Mallerstang)
(Contains 4 photos) |
|
Ais Gill - Viaduct
(Contains 10 photos) |
Ais Gill - Sunny Brow
(Contains 12 photos) |
|
Ais Gill (road bridge northbound)
(Contains 16 photos) |
Ais Gill (road bridge southbound)
(Contains 60 photos) |
|
Ais Gill - Milepost 260
(Contains 56 photos) |
Ais Gill - Summit
(Contains 30 photos) |
|
White Birch Cottage
(Contains 6 photos) |
(Pete) Shaw Paddock
(Contains 11 photos) |
|
Shotlock Hill
(Contains 13 photos) |
Quarry Farm
(Contains 10 photos) |
|
Lunds - Northbound
(Contains 30 photos) |
Lunds - Southbound
(Contains 17 photos) |
|
Dandry Mire
(Contains 17 photos) |
Garsdale - 'Chicken Shed'
(Contains 12 photos) |
|
Garsdale
(Contains 17 photos) |
Garsdale - South
(Contains 8 photos) |
|
Garsdale Troughs
(Contains 36 photos) |
Rise Hill Tunnel North
(Contains 7 photos) |
|
Rise Hill Tunnel South
(Contains 7 photos) |
Dentdale
(Contains 14 photos) |
|
Arten Gill
(Contains 17 photos) |
Dent Head
(Contains 20 photos) |
|
Blea Moor Tunnel
(Contains 9 photos) |
Blea Moor
(Contains 22 photos) |
|
Ribblehead Viaduct
(Contains 15 photos) |
Ribblehead
(Contains 65 photos) |
|
Ribblehead sidings
(Contains 15 photos) |
Salt Lake Cottages
(Contains 24 photos) |
|
Around Selside
(Contains 19 photos) |
Horton
(Contains 5 photos) |
|
Arcow branch
(Contains 17 photos) |
Helwith Bridge
(Contains 6 photos) |
|
Stainforth
(Contains 4 photos) |
Settle
(Contains 4 photos) |
|
Settle Junction
(Contains 8 photos) |
Tommy Hall's Barn
(Contains 10 photos) |
|
Around Long Preston
(Contains 19 photos) |
Hellifield
(Contains 3 photos) |
|
Goosemere Height
(Contains 5 photos) |
Newsholme
(Contains 2 photos) |
|
Cumbrian Coast (north to south)
(Contains 112 photos) |
The wonderful Wensleydale Railway
(Contains 30 photos) |
|
Little North Western (west to east)
(Contains 11 photos) |
Tyne Valley (west to east)
(Contains 46 photos) |
|
Blyth & Tyne (north to south)
(Contains 51 photos) |
West Coast Main Line (north to south)
(Contains 631 photos) |
|
East Coast Main Line (north to south)
(Contains 38 photos) |
Teesside (west to east)
(Contains 105 photos) |
|
Lancashire
(Contains 2 photos) |
Yorkshire
(Contains 17 photos) |
|
North Lincs
(Contains 32 photos) |
Chiltern Routes (north to south)
(Contains 37 photos) |
|
Elsewhere on the network
(Contains 57 photos) |
Preservation
(Contains 8 photos) |